Unpacking API Management policies [Part 2]: 5 ways to handle REST API authentication
APIs power every digital interaction we experience today – from ordering your favorite coffee on your mobile device, to checking the live scores on your sports app, to even reading this blog on your device. With the growing surface of interactions powered by APIs, even the surface area for a potential attack is increasing. Google Cloud’s 2022 report on API security insights and trends notes that more than 50% of organizations faced an API-related security threat at least once in 2021, confirming that APIs have become a favorite target for threat actors. Securing your APIs requires a prudent strategy and a multi-layered approach. But the bedrock of any good API strategy is authenticating the identity of a user trying to access the API. Authentication helps prevent unauthorized access or abuse, which can have security and performance implications for the API and the backend systems it connects to.
Authentication in Apigee is primarily handled through policies – rules that an API gateway enforces when processing incoming requests. But choosing the right authentication policies requires a balance of security, usability, and simplicity tailored for your API and use case.
In this second blog of the series which unpacks Apigee’s API management policies, we will explore different authentication policies that help prevent unauthorized access or abuse. Before we dive deeper into the topic, let’s start with a few basic concepts.
Learning the fundamentals: Identity, authentication, and authorization
Identity is a digital user account that requires access to your resources (Ex: API, system, services etc.,). A user account can also represent non-humans, such as software, Internet of Things devices, or robotics.
Authentication is the process of verifying the digital identity of a client or a user before granting access to an API. Someone (or something) authenticates to prove that they’re the user they claim to be.
Authorization is the process of determining what resources a user can access.
Identity Provider (IdP) is a system entity that creates, maintains, and manages identity information and provides authentication services.
Implementing authentication in Apigee
Authentication is typically done by requiring the client to provide some form of credentials – such as a user name and password, an OAuth token, or a JSON Web Token (JWT). As an API owner, you can implement authentication in Apigee using policies. Specifically, security policies in Apigee allow you to authenticate and authorize every request, and protect your content.
Apigee offers 50+ policies out of the box. As part of these policies, there are several different API authentication policies, including basic authentication, OAuth 2.0, SAML, mutual SSL, and API keys. In this blog post, we will explore the functionality of some authentication policies, when to use them, and how you can implement them based on your application needs
You're not limited to the set of policy types provided by Apigee. You can also write custom scripts and code (such as JavaScript applications and Java), that extend API proxy functionality and enable you to innovate on top of the basic management capabilities supported by Apigee policies.
Choosing the right authentication method for your API use case
Choosing a specific authentication method used will depend on the requirements of the API and the needs of the API client or user. Prior to choosing a given authentication method, practitioners should address the following design considerations
- Compatibility with API and client application: Consider addressing questions about the client – if it is a mobile or web application and if it requires assertion, and whether the end user has given the application consent to access resources on their behalf.
- Identity provider: API Management solutions (like Apigee) generally provide few out-of-the-box capabilities like automatically issuing client credentials. But organizations might want to manage user identities using custom capabilities or choose to use an external IdP to ensure consistency across multiple platforms.
- Security: Different authentication methods provide varying levels of security for your API and its resources. For example, if your API handles sensitive data, you may want to use a stronger authentication method such as OAuth 2.0 or mutual SSL.
- Self-service onboarding support: Consider the onboarding flow of your consumer developers. Specifically if the authentication method should support them in onboarding to an API with self-service
- End user authentication: Should your method also support authentication calls with end users (human only)?
- Developer engagement analytics: Should your authentication method also allow you to capture analytics data about the developers and apps using your APIs?
Based on these criteria, we have identified a few commonly used authentication methods that can be implemented in Apigee. With the framework below, you can choose the authentication method that best suits your API use case
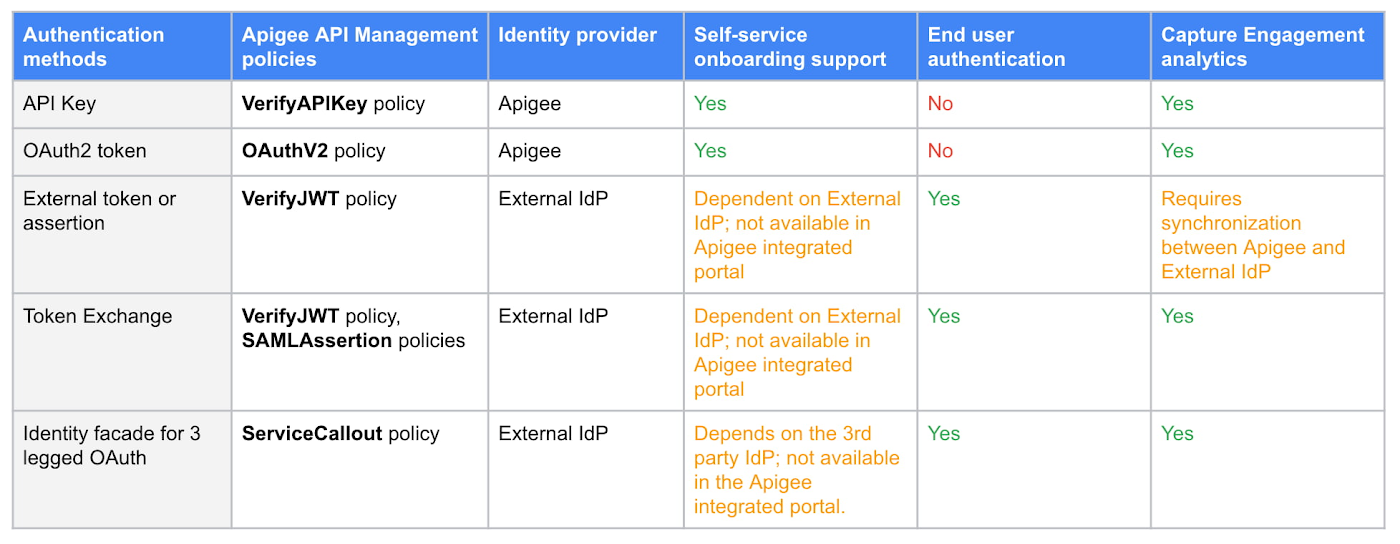
#1 API Key (identification only)
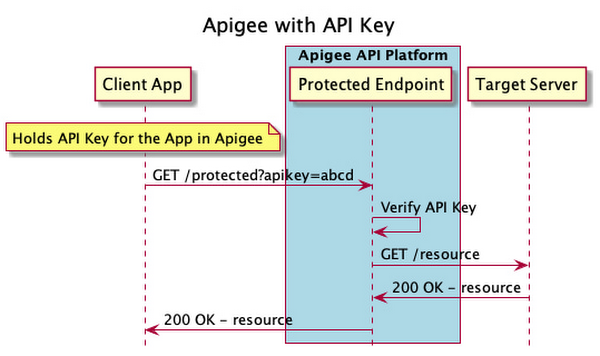
One of the easiest ways to identify an API client is by using an API key. Apigee’s built-in identity provider can issue client identifiers to be used as API keys and validated with the out-of-the-box VerifyAPIKey policy.
The simplicity of API keys comes with the caveat that this mechanism can only be used for identifying incoming requests. It should not be used as an authentication mechanism in untrusted environments. API keys are generally long-lived and can often be read from access logs or are not properly masked in tooling.
#2 OAuth2 token
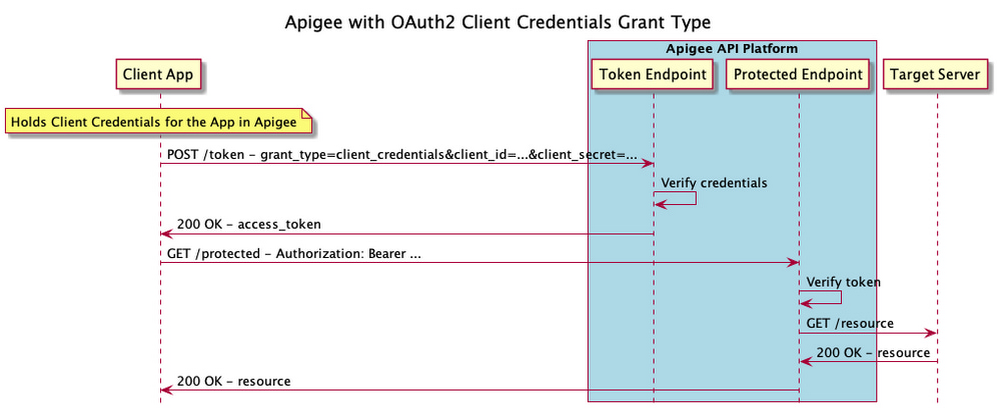
OAuth2 is a comprehensive industry standard that is widely used across API providers. Apigee supports a variety of different grant types for OAuth2 — as described in the official documentation — and most widely-adapted Apigee authentication mechanisms are built using the OAuth2 standard.
A common implementation is to access APIs with the OAuth2 client credentials grant type. In this scenario, the API client uses its client ID and client secret to request an access token. The access token is then used on subsequent calls against the protected endpoints to authenticate the API client. Both the issuance of access tokens and their verification can be achieved using the built-in Apigee policy, as described here.
#3 External token or assertion
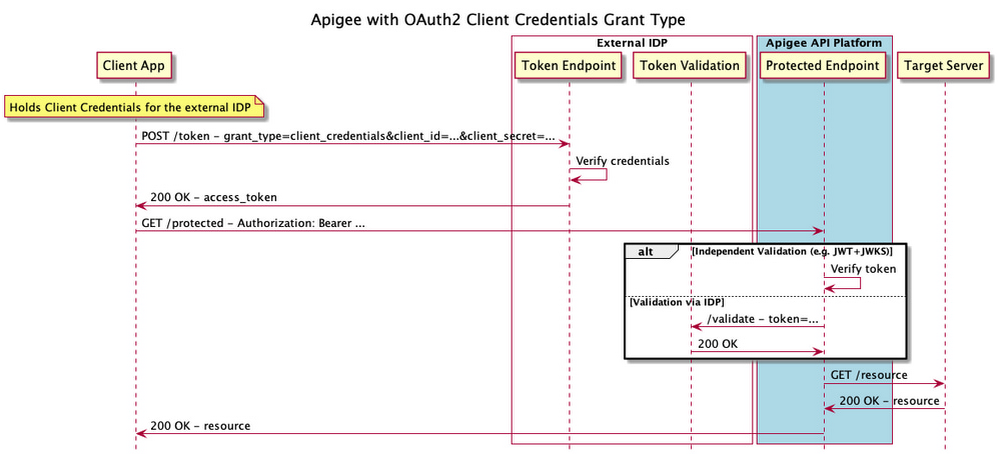
By using externally generated tokens, Apigee only cryptographically verifies that the token is issued by a trusted issuer. Apigee is not involved in issuing the token and does not automatically hold any information about the application, developer, or API product that is associated with the API request.
For scenarios where some of these aspects are required — such as providing insights into developer engagement or easily restricting the usage of a token to a specific Apigee environment — additional synchronization of the Apigee identities and the externally managed identities is required. One common way to associate externally-managed identities with Apigee resources is to synchronize the Apigee and external IdPs through automation and the Apigee API. Technically, this means that the client ID — or API key — of an Apigee app can be included within the claims of a third party token so that the Apigee proxy can identify the client application after the authentication through the JWT signature validation.
Alternatively the POST request to /token for the external IdP can be proxied through Apigee, and the externally-created token can be imported via the Apigee OAuth2 policy and used in subsequent calls, as documented here.
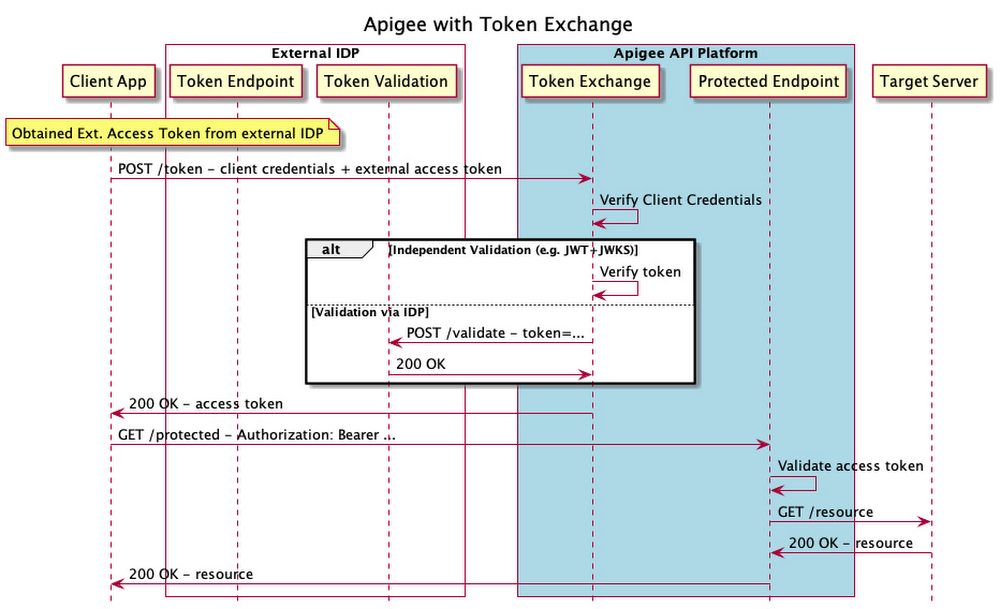
#4 Token Exchange
In Apigee, a SAML (Security Assertion Markup Language) assertion can be used to exchange a token between an identity provider (IdP) and a service provider (SP). SAML is a standard protocol that allows the exchange of authentication and authorization data between different systems. In the context of token exchange, a SAML assertion is a signed XML document that contains information about the authenticated user, such as their identity and any authorization permissions they may have.
A token exchange — as described in RFC8693 — starts the same way as the external token approach described above. In this case however, the externally issued token is exchanged for an Apigee-issued token. The process of exchanging an external token or SAML assertion for an Apigee-issued token adds an additional layer of trust as the external token can only be used to obtain an Apigee token through authorized applications rather than accessing the resource APIs directly. Additionally, you can automatically make the Apigee application, developer, and API product contexts available if they can be gained through the verification of the exchanging client application’s client credentials.
Using SAML assertions to exchange tokens in this way can allow client applications to take advantage of existing authentication systems, while still being able to access protected resources through the service provider.
#5 Identity facade for 3 legged OAuth
Identity facade is a layer that sits between a client application and an OAuth authorization server. Its primary purpose is to abstract the underlying authentication mechanisms from the client application, so that the client does not need to be aware of the specific details of how user authentication is implemented. This can make it easier for developers to build client applications that support OAuth, as they do not need to be familiar with the details of the OAuth protocol.
In addition to abstracting the authentication and authorization mechanisms, an identity facade can also provide other services, such as handling user management and providing additional security measures. But the main disadvantage of the token exchange (explained in the earlier section) is that the burden of exchanging the external IdP token for an Apigee token is on the API consumer. Consumers have to explicitly make an additional call to exchange the token and are temporarily holding on to the external token.
Identity facade for 3 legged OAuth avoids that burden by creating a facade for an external token. This facade proxy calls the token endpoint and then mints an Apigee-issued token that links to the external token. This way, a token validation in Apigee makes the external token available within the flow such that it can be used to call downstream systems.
Because the token is intercepted through the facade, the API client doesn’t have access to the external token directly, meaning that clients won’t be able to circumvent the API proxy by calling the backends directly and using the external token. From a client perspective, the facade nature is transparent and the OAuth flow looks identical to any other authorization code flow.
To simplify the implementation of this pattern we provide a reference implementation of an identity facade that can be used to front any OIDC compliant IdP.
Get started with authentication policies in Apigee?
These are just a few of the many other security policies that you can use with Apigee. You can even write custom scripts that extend API proxy functionalities for specialized use cases. For hands-on experience on implementing authentication and other security policies in Apigee, check out our Skillsboost lab or watch this API Security webinar on demand. For a deep dive on authentication, reference architectures, and comprehensive examples check out our repository on GitHub.
Get started with Apigee today or check out our documentation for additional information. Or if you are interested in continuing the conversation, join our Google Cloud Innovator community.