Process Management in Node.js with PM2
https://javascript.plainenglish.io/process-management-in-node-js-with-pm2-ca32d75c94af
Node.js is pretty good at handling I/O operations but when it comes to CPU-intensive tasks, it falls apart. You can easily stall the application by running a heavy operation and since Node.js is single-threaded, it’s going to block further requests.
Now, to handle this, you could spawn child processes in parallel with the main process so that anytime a new request comes in, it would be handled by this new process. The native cluster module in Node.js allows you to manually configure your application to spawn a cluster of child processes. But wouldn't it be better if there’s a package that handles it for you?
PM2 is a process manager that takes care of everything right from handling multiple processes, and setting up environment-specific deployment strategies, to saving logs to your system. It’s a feature-packed library that is a fan favorite in the Node.js community and this blog post will cover some of those key features. So let’s get started!
...
Now typically we would use **node main.js** to run our application but now that we’re using pm2, we can use **pm2 start main.js**.

You get this table that shows you details like the name/id, the CPU/memory consumption, and the status of the process that’s running your application. You also get an option to explicitly provide a name for your process using the name flag. If you don’t give it a name explicitly, it’s going to use the name of the file as the name of the process.
Now in the screenshot, it looks like the application has stopped. Before the table, you’ll see the “DONE” message but after the table, you don’t see anything. But if you open up your browser and go to http://localhost:3000/light, you’ll see the “Request successful” message that we’re sending back from our API endpoint. So the application is still running. It’s just that pm2 daemonizes it, which essentially means that it’s running the processes in the background, that’s all. You’ll find the log message in a separate log file, which we’ll look at in the later part of this blog post.
Process management commands
- At any given point, you can view the status of your process by typing in
pm2 statusorpm2 lsorpm2 list. - You can stop a process by using
pm2 stopfollowed by the name or the id of the process(pm2 stop mainorpm2 stop 0). You can also usepm2 stop allto stop all the processes. Once you’ve stopped your process/processes, try to make a request to your application and see if it’s working. P.S It shouldn't. pm2 deletefollowed by the name or id of the process is going to delete that process from the list. (pm2 delete mainorpm2 delete 0). You can also usepm2 delete allto delete all the processes.- There are 2 more commands that help you with managing your processes. One’s the
restartcommand and the other one’s thereloadcommand. Both of these commands essentially re-run a process but the difference lies in how they do it. - A
pm2 restart <process_name/ID>will first kill the process and then start it back again. So there’s some downtime involved when you’re restarting a process. - A
pm2 reload <process_name/ID>, on the other hand, will create a new process in the background. Only when this new process is created will it kill the older one. This ensures that there’s no downtime when you’re reloading a process. If for some reason reload doesn’t work, it’s ultimately going to fall back to the classic restart after a specific amount of time.
Hot reload
When you’re running an application using Node.js, you need to restart your server every time you make a change in your application. Nodemon is a popular library that restarts the server anytime it detects a change. You can achieve the same thing in pm2 using the watch flag. So while starting any process if you provide the watch flag at the end, it’s going to listen for changes and then automatically restart the server (pm2 start main.js --watch)
Some other start options
- max-memory-restart <200MB> — This option will restart the process when it reaches a certain memory limit. You can specify the memory limit in kilobytes (K), Megabytes (M), or Gigabytes (G)
- log
— Log will specify the file inside which you’re going to store your application logs. Try starting a process but this time, use the log flag with the name of the log file at the end.
pm2 start main.js --log ./logFile.txt
Now if you make a request to the light endpoint, you’ll see a file auto-generated inside your project folder called logFile.txt. This file will have the log statement at the top. - restart-delay
will add a delay between automatic restarts. - time flag will add a timestamp for all your logs. Restart your application but this time attach the time flag at the end.
pm2 restart 0 --time. Now make a request to the endpoint, and you’ll see the time stamp before the logged message inside the log file. - no-autorestart will disable auto restart. This makes sense when you want to execute one-time scripts and don’t want the process manager to restart the script after it’s finished running.
- cron flag will restart the process based on the cron expression interval that you add. I have a separate video explaining cron expressions in detail, you can check it out if you want to know more about it.
- no-daemon flag will not demonize your pm2 process. So instead of running it in the background, you’ll now see all your logs and events on the console itself just like you would in the case of a typical node execution.
Now it doesn’t make sense for us to manually add these options on startup or while restarting a process. Instead what we’ll do is add a config file that is going to have all these options so that anytime we start the application, it’s always going to run with those options enabled.
Creating a pm2 config file
To generate this config file, inside your console type in pm2 init simple. This will create a file called ecosystem.config.js. If you are creating your own configuration file, make sure it ends with .config.js so that PM2 is able to recognize it as a configuration file. Inside the file, copy this code snippet.
module.exports = {
  apps: [{
    name : "app",
    script: "./main.js",
    watch: true,
    ignore_watch : "node_modules",
    time: true,
    out_file : "./scripts.txt",
    error_file : "./error.txt",
    env: {
      "NODE_ENV": "development"
    },
    env_production: {
      "NODE_ENV": "production",
    }
  }\]
}
I’ll explain the options that we’ve used over here.
- name: Name of the process
- script: Location of the script to be executed
- watch: To track changes and restart the process
- ignore_watch: Will not track changes for a set of files/folders
- time: Will attach timestamps to the log statements in your log files
- out_file and error_file: Will add respective log statements to these files
You can also add environment-specific options, like for instance if your environment variable values change between testing and production modes, you can add those variables inside env or env_production respectively.
We’ll add a couple of extra options later when we switch to cluster mode, but for now, this looks good.
Now instead of using pm2 start main.js, we can run the config file (pm2 start ecosystem.config.js) and it’ll, in turn, run the script for us. You can add multiple non-Node.js apps inside the apps array and it would still work. PM2 is not just bound to Node.js. You can run a process from a different language like python, for instance, using pm2.
Now that we know a little bit about pm2, let’s see how it helps with managing multiple processes. In the config file, add 2 extra options, exec_mode, and instances.
module.exports = {
 apps: [{
 name : "app",
 script: "./main.js",
 watch: true,
 ignore_watch : "node_modules",
 time: true,
 **exec_mode:"cluster",
 instances:"max",**
 out_file : "./scripts.txt",
 error_file : "./error.txt",
 env: {
 "NODE_ENV": "development"
 },
 env_production: {
 "NODE_ENV": "production",
 }
 }]
}
When you want to spin up a cluster of processes for your application, you need to set the exec_mode to “cluster”. By default, it’s set to “fork”.
When setting up a cluster, you need to mention how many process instances you’ll need. You can pass 0/max which will spin up processes equal to the number of cores in your system. -1 is going to spin up 1 less than the maximum and if you pass in any other number, it's going to spin up that many processes.
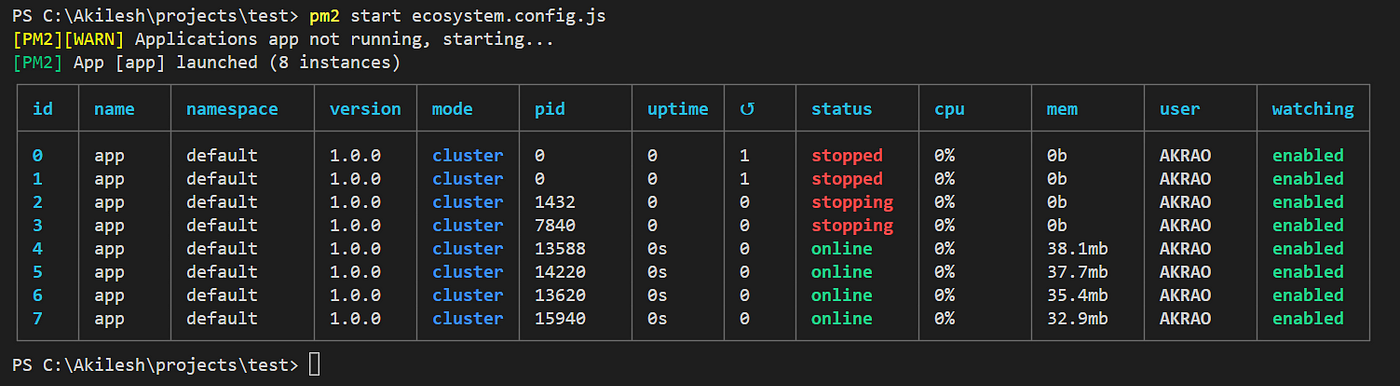
Now if you run the config file, you’ll see a bunch of processes running simultaneously(8 in my case since I have an 8-core system). You’ll also notice that the mode of execution has changed to “cluster”.
PM2 has an advanced dashboard that lets you monitor your processes. You can run your config file and after that use the pm2 monit command to open up this dashboard.
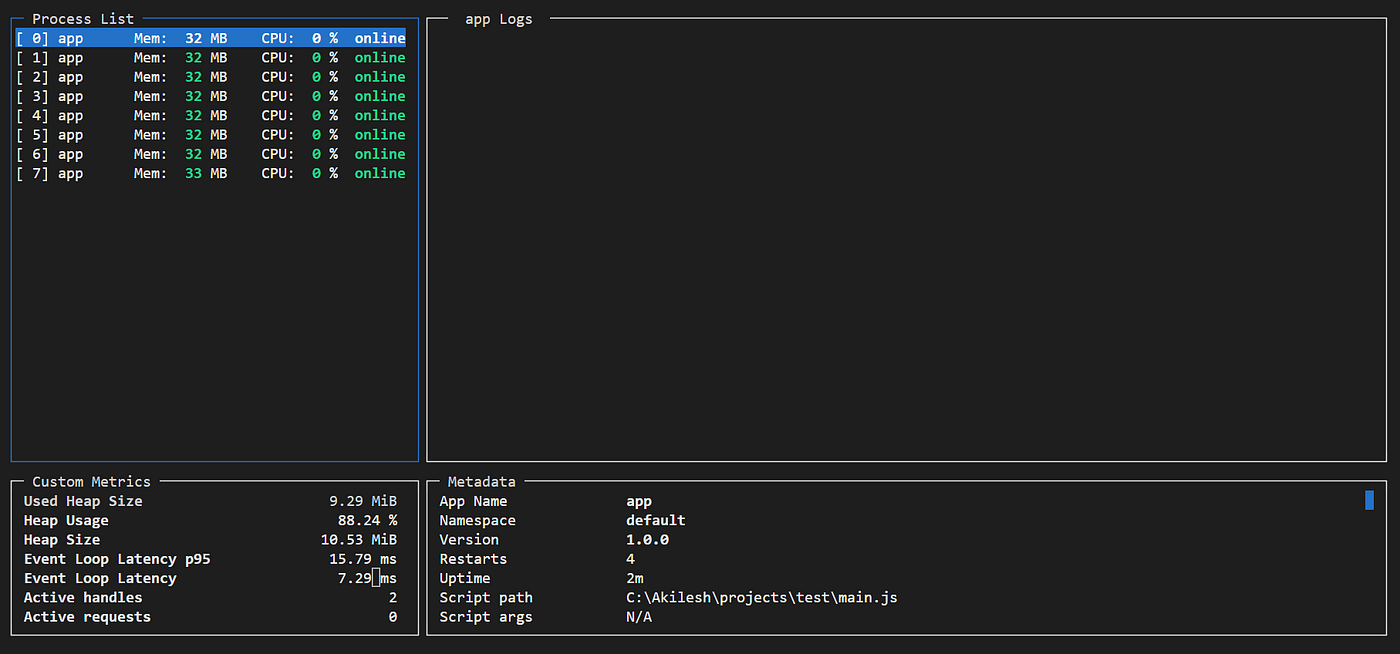
It gives you a more real-time view of all your processes. You can individually check resource consumption and allocation of each of the processes in your system. There’s also a logs section wherein you can track all your logs in real-time.